Official Manual / Getting Started
Shadowrocket Setup Guide
Import an existing subscription, choose Global Routing, and test the connection. First confirm a connection you can verify, then adjust rules and on-demand settings.
The workflow is “Add → choose a routing mode → connect → verify → troubleshoot.” Official screenshots help identify fields and navigation. The interface may vary by device and app version, so use the English interface labels to find each option. Do not copy any connection details shown in screenshots.
01 / Add Server · Subscribe
Add a server or import an existing subscription
First determine whether you have a subscription link or a set of server parameters. Each requires a different setup process.
Open Shadowrocket and stay on Home. Find the SERVER group and the Add Server option. If you already have a subscription link, copy the complete link from your existing provider. Tap Add Server, choose Subscribe in Type, then enter the link in the URL field on the add screen. Check that the beginning, path, and trailing parameters are all intact, then save. Subscription links often contain authentication details. Keep them private and do not paste them into public comments or screenshots.
After saving the subscription, wait for it to load, then return to Home and check whether the SERVER group and its server entries appear. If you see a subscription name but no selectable entries, first check for errors during import or update. Do not turn on the connection switch yet. An empty list may mean the link is incomplete or expired, the current network cannot retrieve it, or the returned content is not in the expected format. Repeatedly adding the same link usually creates duplicate groups and does not resolve the original retrieval issue.
Enter server details manually with Add Server
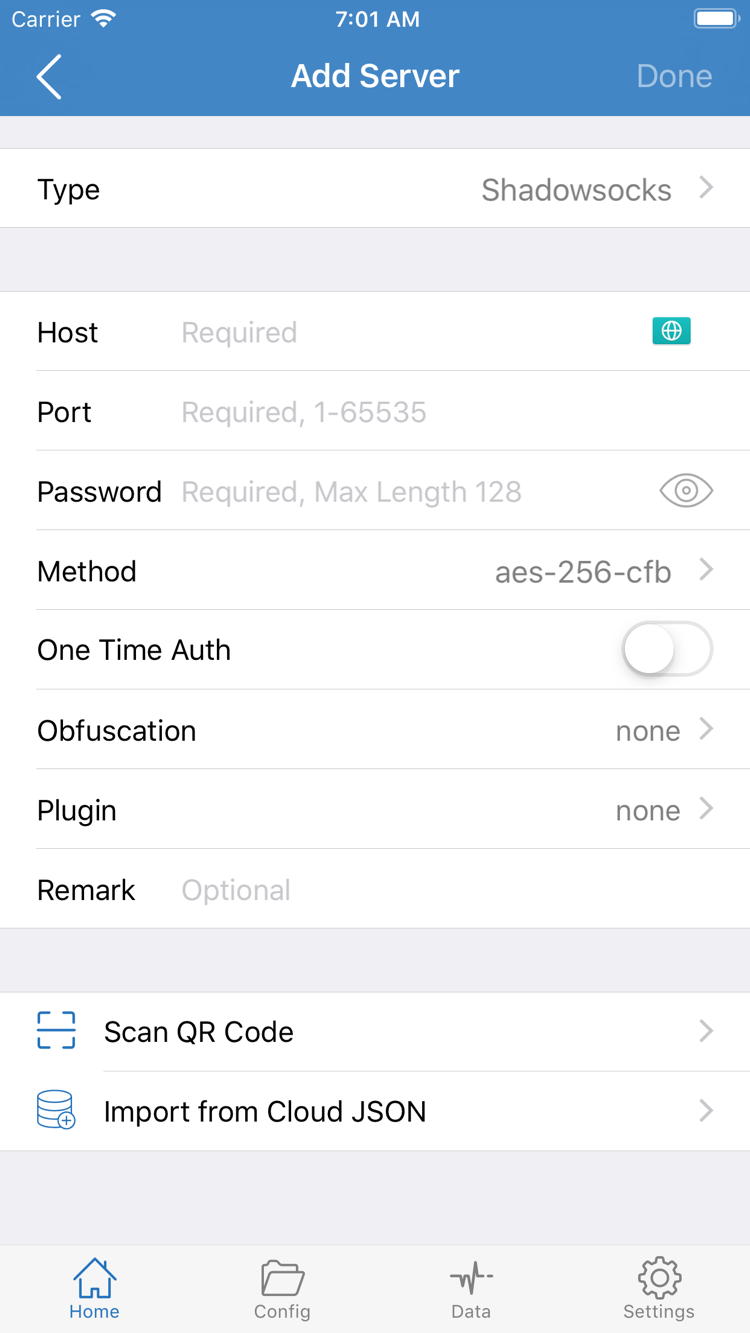
If you have a server address, port, and authentication details, choose the protocol specified in your information under Type in Add Server; do not choose Subscribe. Then check Host, Port, and the fields required by that protocol. For example, Shadowsocks requires you to check Password and Method. Other protocols may show different authentication or transport settings. There is no universal set of default values for these fields. Do not reuse a password, encryption method, or transport option from one protocol for another.
Enter the address specified in your server details in Host and use the matching port in Port. When copying values, watch for spaces, line breaks, and full-width punctuation at either end. Preserve the capitalization and special characters in passwords. If the details specify TLS, a server name, or additional transport parameters, check the corresponding options too. Do not assume setup is complete after entering only an address and port. If you cannot confirm a field, check with the source of your server details instead of switching options at random.
If you have a QR code for import, use Scan QR Code. Use Import from Cloud JSON only when your details specifically provide a compatible Cloud JSON file. After saving, return to Home, select a server under SERVER, and confirm that the selection indicator is on that entry. Seeing a subscription group does not mean a server has been selected. The entry only confirms that it was added; next, choose the Global Routing mode for the connection.
02 / Global Routing · Config
Choose a routing mode and rule configuration
The server determines the connection route; Global Routing determines how requests are handled. Importing a subscription does not mean a suitable rule configuration has also been imported.
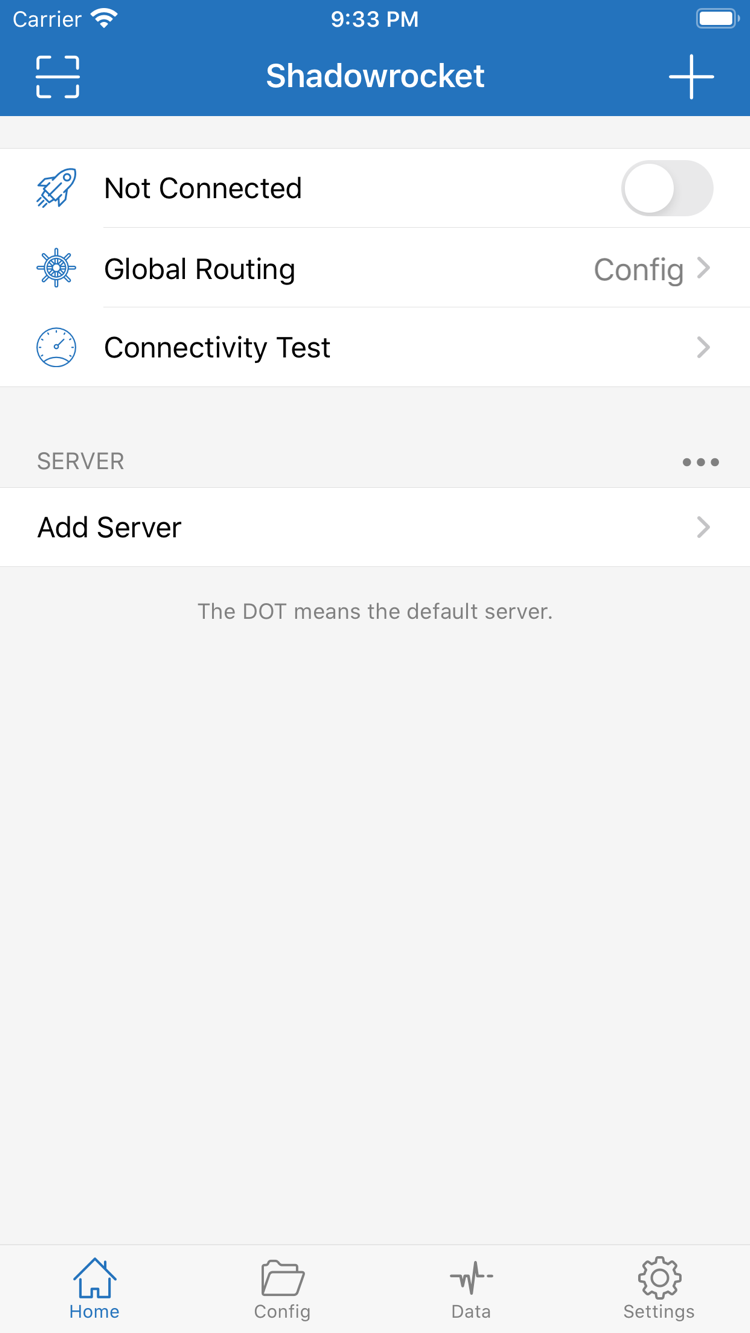
Return to Home and tap Global Routing to see the current selection. The three modes are Config, Proxy, and Direct. Config applies actions based on the rules in the active configuration file. Proxy sends applicable requests through the selected proxy route, which is useful for testing a server. Direct sends requests over the current network. These modes change how requests are handled; they do not supply missing server authentication or fix an unreachable server address.
For an initial test, choose Config if you already have a configuration file you have checked, then confirm which Config is active. If you have not confirmed that the rules are correct, you can temporarily use Proxy to test an existing server, then switch back to Config to check traffic routing. Direct is useful as a comparison with your basic network. A successful request over Direct only shows that the request works on the direct route; it does not confirm that the proxy server is working.
Check Config before changing all your rules
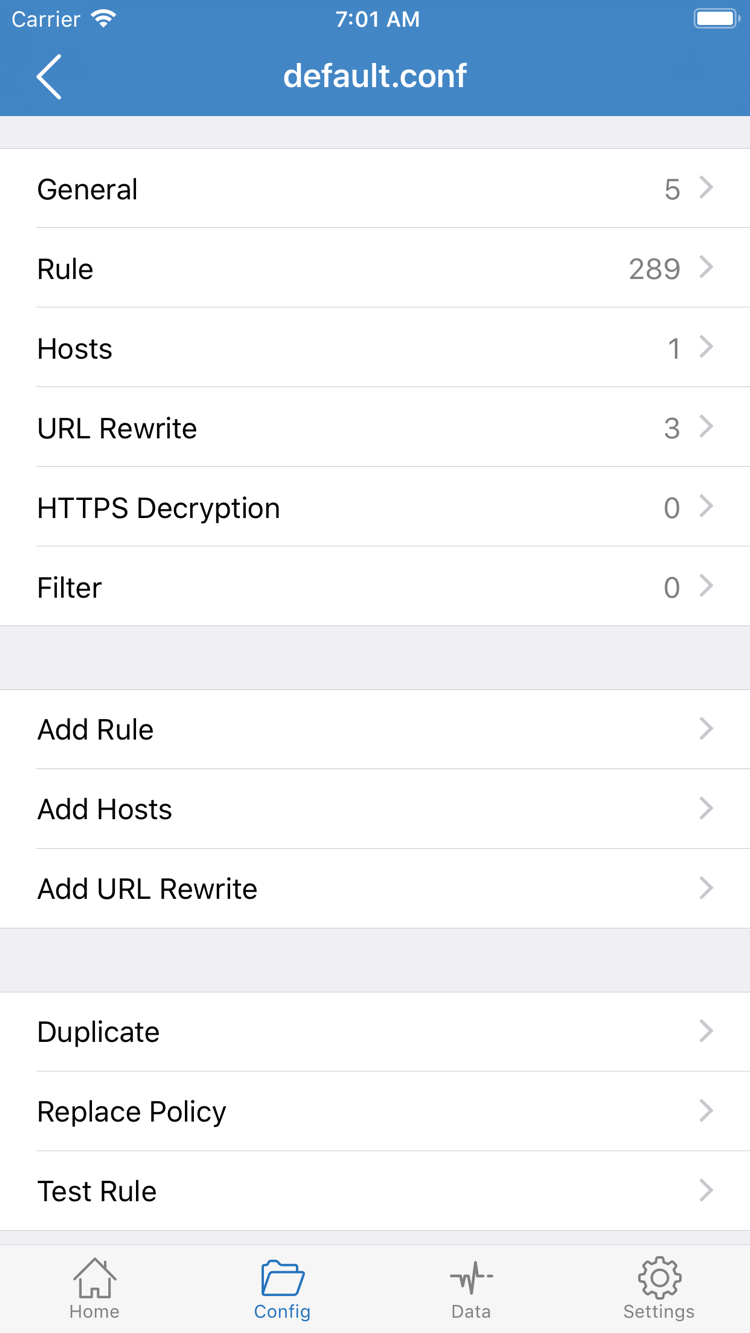
Open Config to see the active configuration file. On its editing screen, you can identify sections such as General, Rule, Hosts, URL Rewrite, and HTTPS Decryption. When getting started, focus on Rule and the active configuration rather than enabling every option. A subscription generally maintains server entries, while Config describes how connections are handled. Check them separately, even if both came from information you already had. Seeing a server under SERVER does not mean Rule has been configured.
Rules are generally matched from top to bottom, and the first matching rule determines the action. PROXY sends a request to a proxy policy, DIRECT connects directly, and REJECT blocks the request. The following is a syntax example, not a complete configuration for everyone, and it does not include a usable server. The policy referenced by PROXY must also be available in the active configuration. Copying a few lines does not create a proxy route automatically.
DOMAIN-SUFFIX,example.comPROXYGEOIP,CNDIRECTDOMAIN-KEYWORD,adsREJECT
Before using Add Rule, export or keep a copy of the current Config. Change one item at a time and note why you changed it. Do not change Rule, Hosts, and HTTPS Decryption all at once before verifying the connection; if something fails, it will be difficult to identify the cause. See the glossary for the matching scope of DOMAIN-SUFFIX, GEOIP, and other keywords. After confirming the mode and configuration, return to Home to make the first connection.
03 / Home · Not Connected
Turn on the connection and approve the system prompt
Check the server and Global Routing again before connecting. The switch status and server availability must be tested separately.
Return to Home and confirm that the selected entry under SERVER is the server you want to test. Check that Global Routing is still set to the mode chosen in the previous step. Once confirmed, turn on the connection switch beside Not Connected at the top. When establishing a connection for the first time, the system may prompt you to add a VPN configuration. Read and approve the prompt, complete the system verification required by your device, then return to Shadowrocket. Do not repeatedly tap the switch before system approval is complete; that can make a pending authorization seem like a connection failure.
The system VPN configuration routes traffic within the app's handling scope through the client. Allowing the configuration does not mean server authentication has succeeded. After returning to Home, check whether the connection status at the top has changed and the switch remains on. If it turns off immediately, note the prompt and first check that the system configuration was added, whether the device has management restrictions, and whether another VPN connection is controlling the network. Do not delete all network settings on the device just to retry.
If the status stays connected, do not change any more settings yet. Keep the server, routing mode, and network conditions unchanged and continue to the next step. You can note the selected server name and Global Routing mode for comparison later, but do not record a password or complete subscription link. A switch that stays on only indicates that the client connection is established. Confirm remote response, page availability, and rule matching with actual requests.
04 / Connectivity Test · Data
Check test results and actual requests
Verify three things separately: the client stays connected, the server route responds, and the target request uses the expected action.
Tap Connectivity Test on Home and wait for the current test to finish. The result indicates connectivity for a specific test method and target; it does not mean every website or app will be accessible. A single timeout does not prove that a server is permanently unavailable. Keep the current conditions and test again to see whether the result is consistent. If you use a different Test Method, treat it as a separate test and do not compare its displayed values directly with those from another method.
Next, open a browser, visit a page you expect to be accessible, and refresh it. Use a new request where possible so you do not mistake locally cached content for a successful connection. Then return to the client and check the available connection records in Data. Use the request time and destination domain to find the page request. If the records show a matched rule or policy, check that it matches your configuration: does a request expected to go direct use DIRECT, does a request expected to use a proxy go to PROXY, or did REJECT match first?
If a page works under Proxy but fails under Config, first check Rule order, policy references, and domain resolution. You do not need to reimport the subscription immediately. If both modes fail, continue checking the server and network route. If only some page resources fail to load, check the separate domains used by those resources; reaching the main page and reaching every resource are not the same result.
An increase in traffic values in Data only indicates that requests were recorded or processed. On its own, it does not prove that a specific request used the correct route. After testing, keep the configuration you have confirmed works, then gradually restore the mode you need for daily use. If you need automatic connections, review the On Demand conditions afterward. Verifying a manual connection first helps separate trigger issues from server issues.
05 / Settings · Diagnostics
Troubleshoot based on where the issue occurs
Change one variable at a time. Keeping the error message and reproduction conditions is more useful than repeatedly deleting all settings.
No servers appear after import
Turn off the connection first and confirm that the basic network can access a regular page. Then check whether the existing subscription URL is complete, has expired, or contains spaces. A failed subscription update and a failed server connection happen at different stages: in the first case, no entries have been retrieved; in the second, entries exist but no usable route can be established. Do not adjust Global Routing before any server entries are available. If the existing details need to be reissued or access restored, check with their original source. Do not send a complete subscription to strangers.
Entries appear, but tests keep timing out
Open the entry's edit screen and check Type, Host, Port, and authentication fields against the original server details. Then check the required Method, TLS, or transport parameters for the protocol. Confirm that the device system time is accurate; a significant discrepancy may affect secure connections. If possible, test the same entry separately over Wi-Fi and cellular data. Change only the network, not the protocol, between tests. If only one network fails, investigate that network route first. If all networks fail, focus on the settings and remote availability.
The switch is on, but the destination is unreachable
Check Global Routing again. If Direct is selected by mistake, requests that need a proxy will not switch to the proxy route just because the connection switch is on. If you use Config, check whether an earlier REJECT rule matched or the request was assigned to an unavailable policy. You can temporarily switch to Proxy for comparison, then return to the previous mode. Do not hide the issue by disabling all rules, and do not treat one inaccessible destination as proof that the entire client is not working.
Keep troubleshooting details in Settings
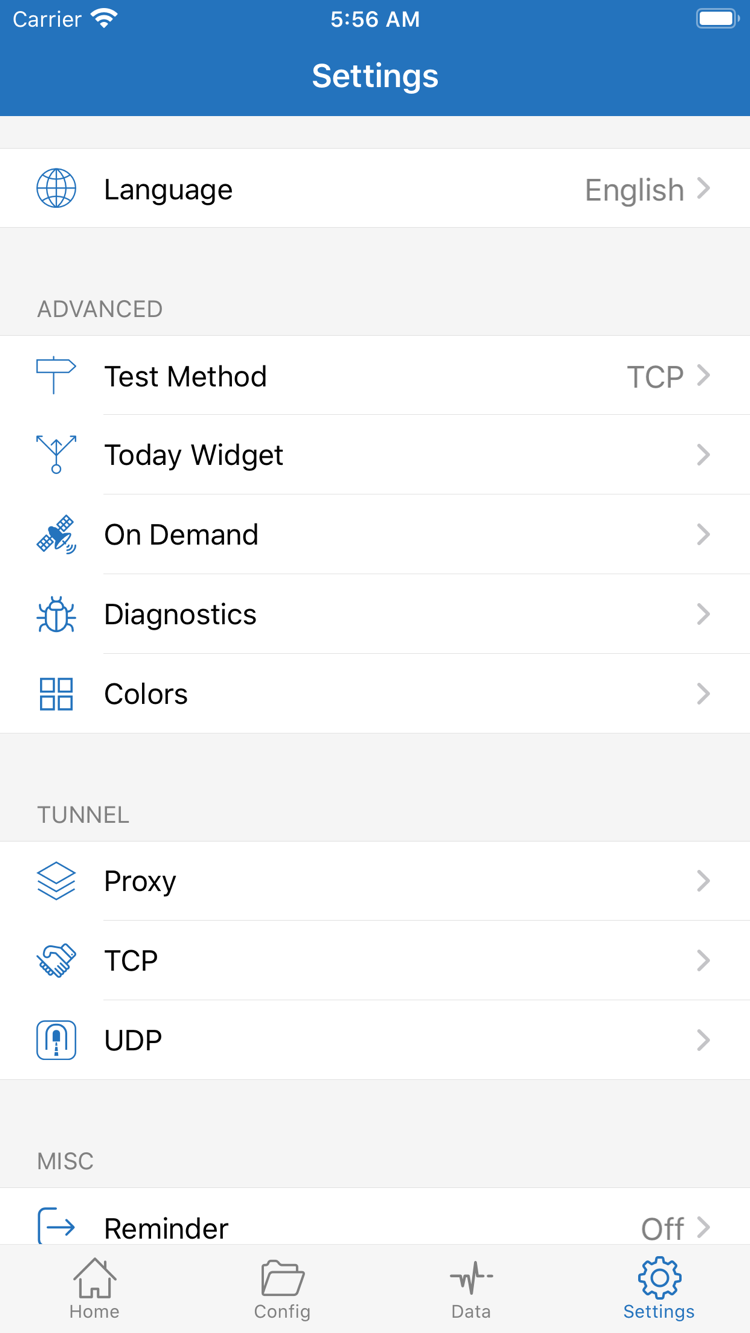
Open Settings and first check whether Test Method suits the current test. If you need more information, review the diagnostic details in Diagnostics. On Demand, Proxy, TCP, and UDP affect different parts of the connection process, so avoid changing them all at once when troubleshooting for the first time. If connections turn on automatically and repeatedly, check the existing On Demand conditions. If only a specific type of traffic fails, investigate the corresponding setting instead of resetting everything.
When keeping notes, record where the issue occurred, the routing mode, the network used, the original message, and the comparisons already tried. Before sharing diagnostic screenshots, hide subscription addresses, passwords, authentication details, and personal connection information. See Frequently Asked Questions for more specific issues. For store regions, purchases, and restoring a previous purchase, see the App Store guide. Once troubleshooting is complete, restore the configuration you have verified and stop adding unnecessary changes.